
WF26VN G3p Y-WING

Step 001: WF26 Journey
Van Nuys
So many pieces of history...
When we decided to recreate the Van Nuys ILM Model Shop for it's 50 year anniversary, we had to divey up the plethora of studio models on the main table. There were plenty of X-Wings (and backup builds), but not so much on the Y-Wings. Gold 3 (circled here) was an original pyro and that was later redressed for later movies. Very few builds of it in the original state exist. So of course -- right up MY alley! (and I had never built a studio Y-WIng... yet, only four months to do it!
Status: Completed

Step 002: The Gathering
Digging Deep
To the Stash-Cave, Batman!
I gathered up all of the old vintage resin kits, parts, and other stuff I could find in the stash... believe it or not, there was enough there (plus sourcing more of the unique Gold3 parts) that this WAS a possibility.
Status: Completed

Step 003: Choose Wisely
Gold3-ish
Let the Madness Begin...
After looking over all the parts for the quick cobble-job ahead, I found that the ORIGINAL (think MR) "huge quirky block of resin" fuselage was best suited to quickly pull this off, and more parts were in the right spots. So... off we go!
Status: Completed

Step 004: Da Crusher!
Laaaarge
Crushing it!
So firstly, since the solid resin fuselage (and head) needed to "park" over someone else's Gold5... I had to come up with small, but adjustable, stand that could offload the weight long-term during the exhibition (part of the reality of recreation, but being "safe" in today's cost model).
Status: Completed

Step 005: Cobble Job
Fitting the Bill
So many details...
Redid/rescribed the head. Drilled and milled to try and reduce some of the weight. Chiseled off the sections behind the shoulders, where many parts unique to Gold3 (pyro) were located. Many were sourced from kits not in my stash, and others were taken from a box of Y-Wing resin parts I had for a long time from an RPF run long ago. Used an oscillating saw and shaved off the shoulders, rear of the wings, and the backend. The backend was actually mostly correct, but was smashed from being in a vintage box for so long. All things considered... it mostly all fit!
Status: Completed

Step 006: Back in Black
Hmmm...
Starting to look like something...
Assembled... primed... and ready for action!
Status: Completed

Step 007: Painting Pains!
Whether Weather!
The Weather REFUSED to Cooperate!
WF26 was approaching and (unfortunately) the weather would not cooperate... frost almost nightly, storms and cold, damp rain almost daily, and I simply could not paint this in the garage or outside. I ended up (painstakingly) painting in sections and then rotating the huge ship in my paint booth... not ideal, but eventually got there. Here I was working through the bottom.
Status: Completed
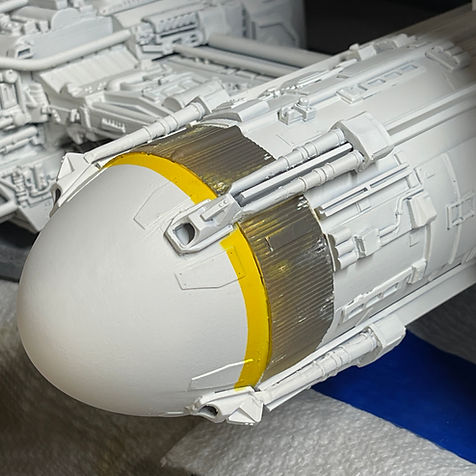
Step 008: Taping Trauma
Less is More
Matching one page of reference!
The original Gold3 (pyro) had a rough, but simpler paint job. There were less pipes too, in this version. Weirdly, the engine bands were seemingly more robust then most of the other Y-Wings, with multi-layers of paint beyond the yellow strips. Started with mud, then layered in light and dark lark, then over-sprayed with base-coat and chipping. Really underestimated the amount of taping that was done in these two sections! Got 'er done, though! Really love how it turned out!
Status: Completed

Step 009: Almost There!
All Wings Report in...
Gold 3 Standing By...
Got it nearing completion a couple of weeks before WF26 and the huge Van Nuys exhibition. Just needed to figure out a case for transporting it without destroyer it.
Status: Completed

Step 010: Ready to GO!
Off to the Big Show!
On the case...
Found this idea online from another Y-Wing builder... not a cheap case, but did the trick perfectly! I also will get one of these for transporting my cutaway (cross-section) ISD. Ended up using a pick-n-pluck Pelican case (say that 10x fast). Was really solid and if you angle it a bit towards the front, you can have it rest against the engine eggs.
Status: Completed

Step 011: Showtime!
Wonderfest 2026
Stack of Ys...
This was really cool to see the Y-Wings on the table. It was my honor to display along with my fellow modelers. I did a small blurb on the Y-Wings at the end of the TIE Fighter segment on Tested! We did not have the Gold Leader in place, yet, so we kind of winged it, but seeing them stacked up was insane! Our Y-Group only got one shot at this (since there were no backups), but thanks to Scott Graham, Carter Cooksey, and John Simmons as together we pulled off Ys beautifully! They are front-and-center of every pic!
Status: Completed

Step 012: Full Glory!
Tested!
Recognized!
This was the end result of our efforts on the "money-shot" table of ships! Tested! did a longer video of the entire room with our group leaders. Mad love and respect for them and EVERYONE involved!
Status: Completed